Author: Allison

  • October is National Cookie Month!!

    Martha Stewart Surprise Cookie and Tazo Wild Sweet Orange Herb Tea

    October is now officially my favorite month. A whole month dedicated to celebrating cookies?!?

    These Surprise Cookies are some of my very favorites. A soft, dense, cake-like cookie topped with marshmallows and chocolate frosting. We always include some kind of sprinkle – it’s a family tradition now. {G} was telling me the other day her first memory of these cookies…I made them when we hosted her first friend sleepover 6 years ago.

    I have a feeling October is going to be super yummy!

  • Automoblox – Toy Tuesday

    One of my favorite toys is Automoblox.

    2012 A9-r Sports Sedan

    Amazing, award winning design, beautiful materials, ingenious play possibilities, and fun for girls and boys.

    Highcroft Trailer Set

    In both the large and mini sizes, these toy cars are super cool.

    Mini A9-s, X9-x, M9 3-pack

    I have no affiliation with Automoblox, I just love their cars!

    Right now, until Monday October 10, 2010, Automoblox is offering 25% off EVERYTHING on their website! Coupon code: fallsale.

    AND, they are offering free ground shipping on orders of $75 and more. Coupon code: ship75.

    See website for details.

  • New Feature – Toy Tuesday

    As many of you know, I’m somewhat of a toy snob. My oldest daughter still whole heartedly believes in Santa Claus because she knew at a very young age, without any doubt, that her mother would NEVER, EVER give her a Barbie for Christmas :). Toys that didn’t meet my standards were quietly and quickly disposed of (to good will, of course).

    Nikki Baby Blue from Kathe Kruse

    The occasional kids meal from a fast food restaurant was ordered WITHOUT the toy, thank you very much.

    Shopping Net with Wooden Vegetables from Haba

    The dog eared magazine that’s been carried around in my bag for the last month? A toy catalog…that I drool over, despite the fact that my youngest child would BARELY play with anything that I might order from it.

    Balancing Cactus from Plan Toys

    One of my favorite professors in college said that children at play are at their “work.” What they’re doing at the youngest age is making sense of the world around them and preparing themselves for an adult life. Take a mental inventory…What are your children learning from the toys in your home?

    Gourmet Chef Kitchen from Educo

    I’m always on the lookout for great toys. Toys that are beautiful, interesting, well made, multifunctional and open ended, leaving it for the child’s imagination to determine it’s many uses. Most toys labeled “educational,” are most definitely NOT educational.

    Wooden Blocks from Kapla

    So I thought that every Tuesday I would try and share a great toy that I’ve come across. Even if you’re not buying toys for your own children, you might be thinking about toys for friends and co-workers children or your grandchildren.

    What are the toys that you’ve loved the best for your own children?

    Which ones have stood the test of time and which ones would you save for your grandchildren?

  • Grandma Lavelle’s Dresden Plate Quilt

    My grandmother, Lavelle Pyper Wallace, was renowned for her thrifty Scottish nature and her impressive baking and homemaking skills (I’ve talked about her before, here). When Grandma Wallace passed away, my mother inherited a “day old” bread bag filled with dresden plate quilt squares my grandmother was in the process of making.

    For almost fifty years, my mother has kept these treasured quilt squares tucked away, still in the old bread bag, until she could finish the quilt her mother-in-law started.

    My grandmother had sewn some of the dresden plates onto squares of muslin, but not all, so my mother carefully unattached them, sewed all the plates onto new cotton, and finished the quilt top. She just had the top machine quilted and will soon finish the binding.

    All the dresden plates are different, and were made with whatever scraps of fabric my grandmother had on hand. Remnants from other projects, scraps from old clothing, or fabrics that she found at a discount or that were given to her were turned into something beautiful and useful.

    I think it’s amazing, Mom! Thank you for preserving and finishing what will be a new family treasure!
  • Whole Wheat Chocolate Chip Pancakes

    Our family LOVES this recipe for whole wheat pancakes. {I} especially likes his with chocolate chips baked inside with peanut butter and maple syrup on top. Decadent, I know, but a growing boy needs something to stick to his ribs! {G} likes hers with peanut butter as well. {K}? He likes his with butter. The Mr. likes his with raspberry jam and syrup.

    I like my pancakes with fresh fruit. The peaches have come on late this year, so I’m enjoying a taste of summer even as the leaves begin to turn and autumn is arriving.

    Make up a double batch and freeze the extras. Pop them in the toaster for a fast, easy and nutritious breakfast!

    Whole Wheat Chocolate Chip Pancakes

    2 cups sour milk (I never have sour milk, so I squeeze half a lemon into the milk and let it curdle for a few minutes)
    2 cups whole wheat flour
    1 tsp. baking soda
    1 tsp. baking powder
    1/2 tsp. salt
    2 eggs
    2 Tbsp. melted butter
    1/2 cup chocolate chips

    Sift the flour, baking soda and powder, and salt together. Add to the sour milk and mix gently. Next add eggs and mix. Fold in melted butter.

    Ladle pancake batter onto hot, buttered griddle. Sprinkle chocolate chips onto batter, then cover chocolate chips with a little bit more batter. Flip to other side when pancake starts to bubble. Cook until golden brown. Store warm pancakes in a tortilla warmer, or sandwiched between a clean kitchen towel.

    Makes 10-12 pancakes.

  • {I} turns 12!

    From this…
    to this…
    Happy Birthday!!
  • peanut butter cookies with reese’s peanut butter cups

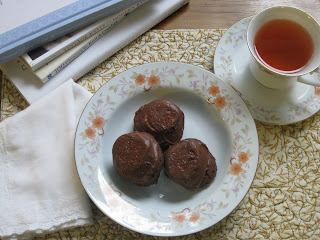
    Of all the cookies that I make for friends and family, THIS cookie recipe is the one I get the most requests for. The combination of a soft and chewy peanut butter cookie topped with a decadent Reese’s Peanut Butter Cup is just about the perfect combination.

    I can only make these if I plan on giving most of them away, because if they are left in my house I’ve been known to polish off a whole batch by myself! I know, very naughty!

    Peanut Butter Cookies

    1 cup butter, room temperature
    1 cup natural peanut butter (NO substitutions – only peanuts & salt, my friends)
    1 cup white sugar
    1 cup packed brown sugar
    2 eggs
    1 tsp. vanilla
    3 cups flour
    1 tsp. baking soda
    1/2 tsp. salt

    Preheat oven to 375º F.

    In a large mixing bowl, thoroughly mix butter and peanut butter. Add sugars, and beat until mixture lightens in color. Mix in eggs and vanilla. Add dry ingredients and mix until cookie dough pulls away from the sides of the bowl.

    Using a medium-large ice cream scoop (or using a 1/4 measuring cup, roll cookies into large balls) drop 8 cookies onto a parchment lined cookie sheet. Bake for 12 to 14 minutes, or until the edges of the cookies are slightly brown.

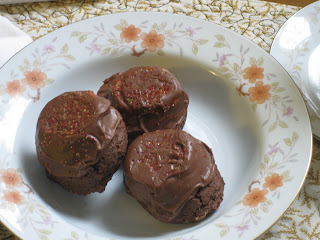
    Remove cookie sheet from the oven to the top of your oven range (or other heat-proof surface). Immediately press a Reese’s Peanut Butter Cup onto the top of each cookie, coming quickly back a second time to press the candy level with the top of the cookie.

    Allow the chocolate to melt, then smooth the top of the peanut butter cup with an offset spatula, or back of a spoon.

    Transfer cookies to a cooling rack and allow to cool completely. If you plan on stacking the cookies, cool in the refrigerator (to harden the chocolate).

    Makes 24 large cookies. You might want to make an extra batch, because they’ll disappear quickly!

  • craft crush

    I have a crush.

    emma lamb

    Like, a total heart beating, sweat inducing, cheeks flushed, butterflies in the stomach crush.

    dottie angel

    COMPLETELY craft crushing on Emma Lamb and Dottie Angel. Can these two gals seriously be any more inspiring?!

    emma lamb
    dottie angel
  • coconut cake

    Okay. Sometimes you see a recipe for something and you just know in your gut that it is going to be good. I had that feeling when I saw the recipe for this cake. I had to make it and *BONUS* I had all the ingredients in my pantry! It was fate. And fate, my friends, tasted really, really good this last week. TWICE.

    Coconut Cake

    4 large eggs, separated, room temperature
    1 c. butter, room temperature
    1 3/4 c. white sugar
    1 c. unsweetened coconut milk
    2 1/2 c. all purpose flour
    1 tsp. baking powder
    1/2 tsp. baking soda
    1/2 tsp. salt
    1 c. buttermilk, room temperature
    1 tsp. coconut extract

    Preheat oven to 300º F.

    Butter two 9 inch cake pans. Line pans with parchment paper circles and butter parchment. Coat pans with all purpose flour, shaking off excess. Set aside.

    Sift flour, baking powder, baking soda and salt in a medium bowl. Set aside.

    Combine buttermilk and coconut extract. Set aside.

    In a clean bowl, beat egg whites with a pinch of salt until stiff. Set aside.

    In a large mixing bowl, cream butter. Add sugar, 1/4 c. at a time, until butter is pale yellow. Add coconut milk and egg yolks and mix until fluffy. Alternately add dry ingredients and buttermilk/extract with your mixer on low speed. Gently fold egg whites into the cake batter. Pour batter into two 9 inch pans and bake in oven for 75 minutes. After 60 minutes, check cake with toothpick. Cake is done when your toothpick comes out clean.

    When cakes are done, remove from oven and carefully loosen from sides of pan. Flip cakes out of pans onto a cooling rack. (OPTIONAL: While cakes are still warm, poke small holes in cakes, without poking all the way through. Reserving 2 Tbsp. of coconut milk for your frosting, drizzle remaining coconut milk on the tops of cakes) When cakes are cool, wrap in plastic and freeze several hours or overnight.

    Frosting

    1/2 c. butter, room temperature
    8 oz. cream cheese, room temperature
    1 to 2 Tbsp. coconut milk
    1 tsp. coconut extract
    1 to 1 1/2 lbs. powdered sugar

    Toasted Coconut

    Spread about 3 cups of sweetened coconut in a single layer on a parchment lined baking sheet. Place in a 325º F oven for 8 to 10 minutes. Watch closely! Coconut is done when some, but not all, of the coconut is golden brown. Cool and mix the toasted coconut together.

    In a large mixing bowl, cream butter and cream cheese until smooth. Add 1 Tbsp. coconut milk and coconut extract. Add 1 lb of powdered sugar and mix well. Continue adding up to 1/2 lb. additional powdered sugar for a stiffer frosting. Add more coconut milk if it gets too stiff.

    Remove coconut cakes from freezer and frost cakes immediately, using a generous amount of frosting between layers. Press toasted coconut all over cake. Allow cake to come to room temperature before serving.

    * I used unsweetened coconut milk instead of cream of coconut called for in the original recipe to cut down the sweetness a little…it was perfect. The cake was very moist, but firm (this would be a great cake for a wedding!). You can use cream of coconut (like Coco Lopez) instead of the unsweetened coconut if you want more sweet. Usually I want more sweet, but I thought the coconut milk was marvelous.


  • From Heart to Hand: African American Quilts Exhibit at the BYU MOA

    This last weekend I had the opportunity to visit the Brigham Young University Museum of Art with dear friends. On exhibit until November 15, 2011 is a collection of African-American quilts made by women from the Alabama region from 1945 to the present. It was so interesting to see these quilts and think about the women who made them and the many hours they spent stitching and quilting them together.

    This first quilt by Mary Lee Bendolf made me think of a well loved bookshelf, full of interesting books. I liked the strong architectural quality of the piece, as well as the play of light and dark.

    Strings, Mary Lee Bendolf, 2003-2004

    I really loved this crib quilt made ca. 1945. All of the vintage floral fabrics made my heart flutter! And I thought of the love stitched into this quilt, pieced together with fabrics on hand, and made for a new little one.

    Crib Quilt, Unknown, ca. 1945
    Close up of Crib Quilt

    This next quilt grabbed my attention because I have a large pile of thrashed jeans at home waiting to be made into a outdoor park quilt! I loved Catherine Somerville’s geometric design and the faded and shadowed spots where the pockets had been removed from the fabric. I really loved this quilt because it also reminded me of my Grandma Lavelle Pyper Wallace, who was a master at thrift and industry and who would have turned a pile of used work clothes into something beautiful and useful too.

    Log Cabin/Checkerboard, Catherine Somerville, 1950-1960

    This quilt, I think, was my very favorite. I LOVE, LOVE, LOVE it! The bold geometric design, the brilliant use of red and white, the whimsical ticking stripe on the binding. I love everything about this one!

    Pig Pen Quilt, Unknown, late 20th Century

    This Lone Star/Star of Bethlehem quilt was magnificent! The quilter had an amazingly deft hand at color selection and the background colors evoke a sense of the star rising. Truly amazing.

    Lone Star, attributed to Mary Duncan, ca. 1950
    Close up of Lone Star

    This exhibit also has on display a section of 10 of Yvonne Wells quilts. This next quilt of Ms. Wells was my favorite, partly because of the design and color (loving the metallic!) and partly because of the message. Taken from Ephesians 6:10-18 this quilt brings into vivid focus the fight we all fight against our own demons. A triumphant fight made possible by the atonement of Jesus Christ.

    The Whole Armor of God, Yvonne Wells, 1996
    “Take that, demon!”  Close up of The Whole Armor of God.

    The best part of visiting the exhibit was being able to share it with amazing friends! Let’s do this again girls!

    Me, Ruth, and Andrea